> ## Documentation Index
> Fetch the complete documentation index at: https://docs.smartcookieapp.com/llms.txt
> Use this file to discover all available pages before exploring further.
> ## Agent Instructions
> This is the SmartCookie help center for teachers and their students. Answer in the reader's language (Spanish pages have no prefix, English pages start with /en). Only describe features documented here; if something is not documented, say you don't know and point to /contact-support.
# Change your business name and logo
> Change the name and logo your students see in their portal, and the logo on your bills.
You change your business name and logo in **Profile** > **Your business** > **Your space**. If you have teachers, it's also your team's name. Your students see them in their portal, and the logo shows on your bills. Only the coordinator can change them (if you work alone, that's you).
## Change the name
1. Click your profile photo (or your initials) at the top right.
2. Click **Profile**.
3. In the menu on the left, under **Your business**, click **Your space**.
4. In **Business name**, type the new name. Up to 100 characters.
5. Click **Update**. You'll see "Name updated successfully".
 Changing the name doesn't change your booking link or your student portal link.
## Add or change the logo
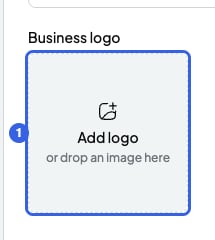
1. In **Your space**, click **Add logo**, in **Business logo**. You can also drag the image there.
2. Choose a JPG or PNG image up to 12 MB.
3. In **Adjust image**, fit the logo inside the square.
4. Click **Confirm**. The logo saves on its own and shows at the top of your menu.
Changing the name doesn't change your booking link or your student portal link.
## Add or change the logo
1. In **Your space**, click **Add logo**, in **Business logo**. You can also drag the image there.
2. Choose a JPG or PNG image up to 12 MB.
3. In **Adjust image**, fit the logo inside the square.
4. Click **Confirm**. The logo saves on its own and shows at the top of your menu.
 To change it, click the logo (**Change logo**). To remove it, click **Remove logo**.
## Where the name and logo show
* At the top of the menu on the left and in the team switcher.
* In the student portal: on your portal's page ("Classes with…"), when they log in ("…'s student portal"), when they accept the invite and in their menu.
* The logo, on your bills and on the payments summary for your accountant. Bills don't show the business name: they show your legal name, from [Fill in your billing details](/en/payments/billing-details).
* In invites to your team: the name in the email, and the name and logo on the page to join.
With no logo, you see your profile photo while you work alone. On a team with teachers, a colourful image made from the name shows instead.
## What you can't do
* The teachers on your team can't change the name or the logo. They see "Only the coordinator can change this."
* Bills you already created keep their logo. Only new ones get the new logo.
* Bill emails don't carry your business logo.
## Related articles
* [Fill in your billing details](/en/payments/billing-details)
* [What your students see in the portal](/en/student-portal/what-students-see)
* [Change your name, email, language, time zone or password](/en/account/account-settings)
This documentation is built and hosted on [Mintlify](https://mintlify.com), a developer documentation platform.
To change it, click the logo (**Change logo**). To remove it, click **Remove logo**.
## Where the name and logo show
* At the top of the menu on the left and in the team switcher.
* In the student portal: on your portal's page ("Classes with…"), when they log in ("…'s student portal"), when they accept the invite and in their menu.
* The logo, on your bills and on the payments summary for your accountant. Bills don't show the business name: they show your legal name, from [Fill in your billing details](/en/payments/billing-details).
* In invites to your team: the name in the email, and the name and logo on the page to join.
With no logo, you see your profile photo while you work alone. On a team with teachers, a colourful image made from the name shows instead.
## What you can't do
* The teachers on your team can't change the name or the logo. They see "Only the coordinator can change this."
* Bills you already created keep their logo. Only new ones get the new logo.
* Bill emails don't carry your business logo.
## Related articles
* [Fill in your billing details](/en/payments/billing-details)
* [What your students see in the portal](/en/student-portal/what-students-see)
* [Change your name, email, language, time zone or password](/en/account/account-settings)
This documentation is built and hosted on [Mintlify](https://mintlify.com), a developer documentation platform.