> ## Documentation Index
> Fetch the complete documentation index at: https://docs.smartcookieapp.com/llms.txt
> Use this file to discover all available pages before exploring further.
> ## Agent Instructions
> This is the SmartCookie help center for teachers and their students. Answer in the reader's language (Spanish pages have no prefix, English pages start with /en). Only describe features documented here; if something is not documented, say you don't know and point to /contact-support.
# Session notes and quick notes
> Write down what you plan and what happens in each session, share notes with your students and keep quick notes for each course.
Every session has its notes, and every course has its quick notes. Session notes can be private or shared with your students; quick notes are always private.
## Which note to use
| Note | What it's for |
| - | - |
| **Private notes** | Your own notes on a session. Only you see them. |
| **Shared notes** | What you want your students to see from a session, like homework. |
| **Quick notes** | Notes about the course in general. Only you see them. |
## Add a session note
1. In **Courses**, open the course.
2. In the **Sessions** tab, click the session. Its two columns open: **Private notes** and **Shared notes**.
3. In the column you want, click **Add**.
4. Type the note and press Enter. The note saves on its own. To start a new line, press Shift + Enter.
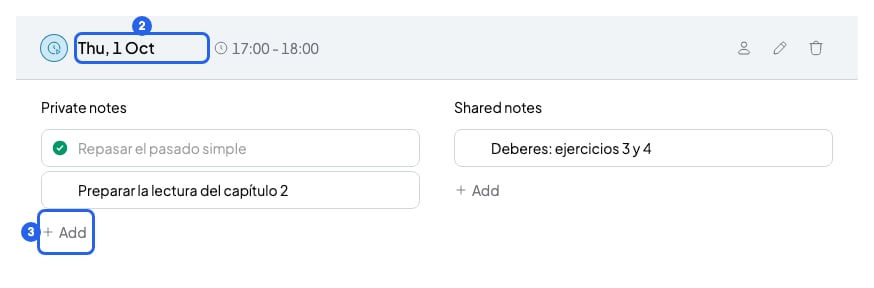 You can also see and write a session's notes from your **Calendar**: click the session, then **View notes**. On **Home**, your next session shows its notes.
## Add a quick note
1. In **Courses**, open the course.
2. Find **Quick notes**. On a large screen it's on the right. On a small screen, it's the **Quick Notes** tab.
3. Click **Add**, type the note and press Enter.
## Organize your notes
On a computer, move your mouse over a note to see its buttons. On a phone, the bin always shows.
* **Edit**: click the note's text.
* **Mark as done**: click the circle on the left (**Mark as done**). Click it again to unmark it.
* **Move**: drag the note by the six-dot icon, at the top right. You can take it to the other column, to another session of the same course or to your quick notes. On a phone, this icon doesn't show.
* **Delete**: press and hold the bin until the circle that appears around it fills up. On a phone, just tap it.
## What your students see
Your students see the **Shared notes** of their sessions in the student portal. In a group session, every student in that session sees the same shared notes.
They never see your **Private notes** or your **Quick notes**. To give them access to the portal, read [Invite students to the portal](/en/student-portal/invite-students).
If you move a note to **Shared notes**, your students will be able to see it.
## What you can't do
* You can't write more than 500 characters in a note.
* You can't edit a note marked as done. Unmark it first.
* You can't share a quick note. Move it to a session's **Shared notes**.
## Related articles
* [Add a session](/en/calendar/add-a-session)
* [Invite students to the portal](/en/student-portal/invite-students)
* [Create a course](/en/courses/create-a-course)
You can also see and write a session's notes from your **Calendar**: click the session, then **View notes**. On **Home**, your next session shows its notes.
## Add a quick note
1. In **Courses**, open the course.
2. Find **Quick notes**. On a large screen it's on the right. On a small screen, it's the **Quick Notes** tab.
3. Click **Add**, type the note and press Enter.
## Organize your notes
On a computer, move your mouse over a note to see its buttons. On a phone, the bin always shows.
* **Edit**: click the note's text.
* **Mark as done**: click the circle on the left (**Mark as done**). Click it again to unmark it.
* **Move**: drag the note by the six-dot icon, at the top right. You can take it to the other column, to another session of the same course or to your quick notes. On a phone, this icon doesn't show.
* **Delete**: press and hold the bin until the circle that appears around it fills up. On a phone, just tap it.
## What your students see
Your students see the **Shared notes** of their sessions in the student portal. In a group session, every student in that session sees the same shared notes.
They never see your **Private notes** or your **Quick notes**. To give them access to the portal, read [Invite students to the portal](/en/student-portal/invite-students).
If you move a note to **Shared notes**, your students will be able to see it.
## What you can't do
* You can't write more than 500 characters in a note.
* You can't edit a note marked as done. Unmark it first.
* You can't share a quick note. Move it to a session's **Shared notes**.
## Related articles
* [Add a session](/en/calendar/add-a-session)
* [Invite students to the portal](/en/student-portal/invite-students)
* [Create a course](/en/courses/create-a-course)