
Before you start
- You need a course: Create a course.
- In 1 to 1 lessons and Group lessons, the course needs at least one student.
Add a session from the calendar
- In the menu on the left, click Calendar.
- Click Create, at the top right.
- Choose Session. A small window opens for the new session.
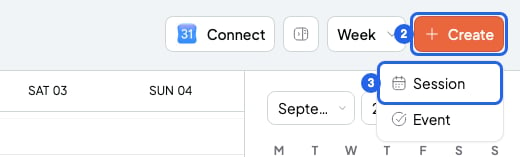
The calendar's Create menu
- In Select a course, choose the session’s course.
- Choose the date.
- Choose the start time and the end time.
- Click Add session. The session shows up in your calendar.
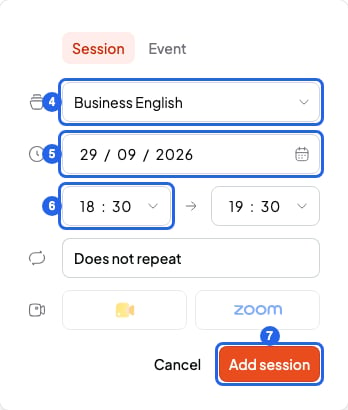
Window to add a session
Add a session from the course page
- In Courses, open the course.
- In the Sessions tab, click Add session. The course is already chosen.
- Choose the date and time.
- Click Add session. The session shows up in the course list and in your calendar.
If the session clashes with another one
An event is something in your calendar with no students, like the dentist. If you already have a session or an event at that time, you’ll see Calendar conflict detected. Click View to see what it clashes with. Then change the time, or click Add with conflicts to add it anyway.If you can’t add the session
- You see No student enrolled here: the course has no students. Click the button next to it (View group). In the Students tab, click Add student.
- You see Copy and send your link to your students so that they can book: it’s a Meetings 1 to 1 course. In this type, each booking creates its session.
- It’s an Open doors course and you can’t add the session: in the session window, fill in Max participants with the number of places.
What you can’t do
- You can’t choose which of the course’s students go to a session. The session includes every student in the course.
- You can’t add a Zoom link yet. To add a Google Meet link: Add a Google Meet link to a session.