
Fill in the required details
- At the top right, click your profile picture (or your initials).
- In that menu, click Payments (not the Payments page in the left menu). The Payment setup page opens.
- Under Your legal name, type your Legal first name and Last name(s), as they appear on your ID.
- In Contact email, type the email where students can reach you.
- In Country, choose the country where you live and get paid.
- Scroll to the bottom and click Save. You’ll see “Billing details saved.”
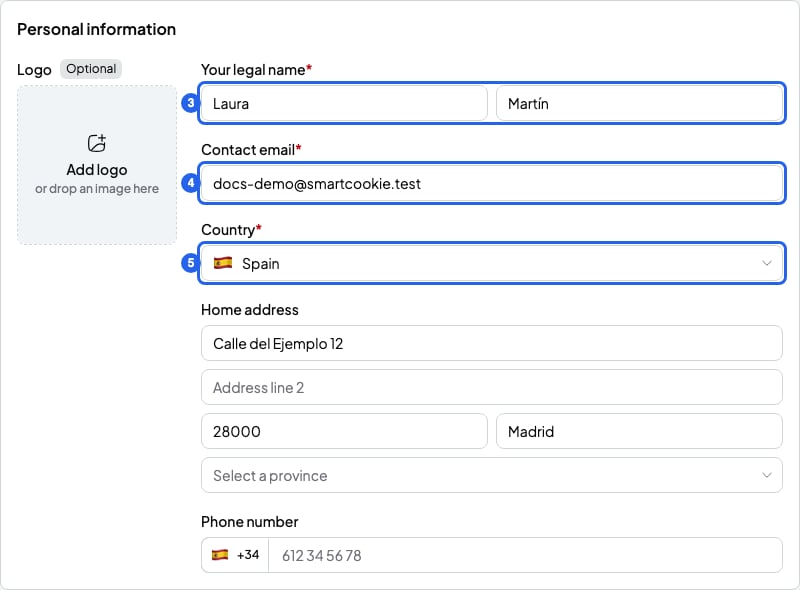
Your personal details in Payment setup
Add the optional details
These details aren’t required, but they help students pay you. Add at least one way to pay (IBAN, other methods or Stripe). Otherwise, your student won’t know how to pay you.- Logo: a PNG or JPG image up to 12 MB. It shows at the top of your bills.
- Home address and Phone number: write the phone with the country code, for example
+44. - VAT rate: from 0% to 100%. VAT is added on top of each bill’s total. Leave it at 0% if you don’t charge VAT. If you’re not sure whether to charge VAT, ask your accountant. You can also change it on a single bill: Add a discount or VAT to a bill.
- Billing currency: the currency you charge in. It’s set to euros at first. If you connect Stripe before creating your first bill, it becomes your Stripe account’s currency.
- IBAN and Confirm IBAN: your bank account, so students can pay by bank transfer. Type it the same way twice.
- Other payment methods: any other way to pay you, like a Bizum number or “cash at the session”. Up to 1,000 characters.
What you can’t do
- You can’t change your Billing currency once you’ve created a bill or connected Stripe. Choose it carefully before you start.
- You can’t change your Country after connecting Stripe. You’ll see “Set by your Stripe account.”
- If you change your details, bills you already sent don’t change. Only new bills use the new details.